If you’ve ever spent time resending donation receipts, updating donor information, or fixing issues with recurring gifts, then you know how quickly these tasks can pile up for a nonprofit. Plus, it can be frustrating for your supporters who have to wait for updates or paperwork.
A donor portal can change all that.
With just a few clicks, donors can log in to view their giving history, download receipts, or update their personal information. This makes their experience smoother and gives you more time to focus on your mission.
The best part? If your site runs on WordPress, setting up a donor portal is simple. With a plugin like Charitable, you can add a secure donor dashboard in minutes – no coding required.
In this guide, I’ll show you how to create a donor portal for your nonprofit website so you can save time, build trust, and give supporters the simple self-service tools they expect.
Why Create a Donor Portal in WordPress?
A donor portal offers your supporters a secure, convenient space on your nonprofit website to manage their own donations – anytime they want.
Instead of reaching out for updates or paperwork, donors can simply log in to:
- View their giving history and see the impact they’ve made.
- Manage recurring donations without any back-and-forth emails.
- Update personal details like their email address, physical address, or communication preferences.
- Stay connected and engaged with your cause, which naturally builds trust and loyalty.
And for you and your team, it means less time spent on admin tasks like resending receipts or updating records by hand.
Now that you know why a donor portal matters, let’s walk through how to set one up using the Charitable plugin.
Here’s everything I’ll cover in this guide:
Step 1: Install and Activate the Charitable Plugin
Before you can build a donor dashboard, you’ll need the right tool, and that’s where Charitable comes in.
Charitable is the best donation and fundraising plugin for WordPress. It comes with a built-in donor dashboard, which gives your supporters an easy, secure way to view their giving history, manage recurring donations, and update their information.
Our team has explored all of its features, and you can learn more about it in our Charitable review.
To get started, you’ll need a Charitable account. On the Charitable website, go ahead and click ‘Get Charitable Now.’
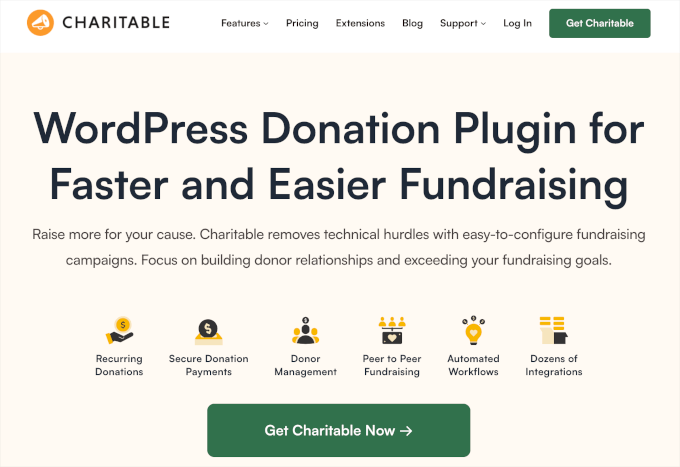
📝 Note: Charitable has a free version for creating simple donation forms. However, to build the donor portal as shown in this guide, you will need at least the Basic plan that includes the Donor Dashboard feature.
After signing up, you’ll find the plugin’s zip file and license key in your Charitable account. Be sure to download the file, copy the key, and keep it somewhere safe.
The Charitable Pro plugin works as an extension of the free core plugin, so we’ll need to install that from your WordPress dashboard.
To do that, let’s head over to Plugins » Add New Plugin.
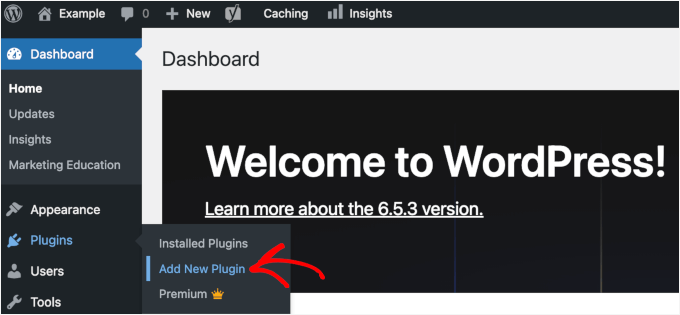
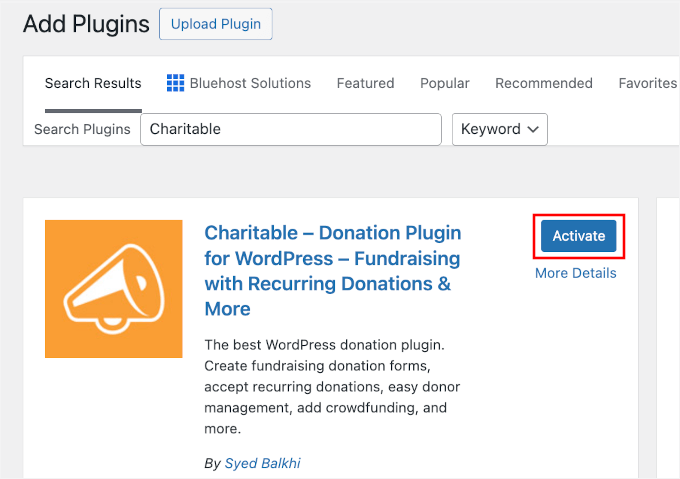
Then, go ahead and use the search bar to look for the Charitable plugin.
In the search result, simply click ‘Install Now’ and then ‘Activate.’
After activating the plugin, you’ll need to install your Charitable Pro version.
On this page, go ahead and click the ‘Upload Plugin’ button, select the zip file from your local computer, and click ‘Install Now.’
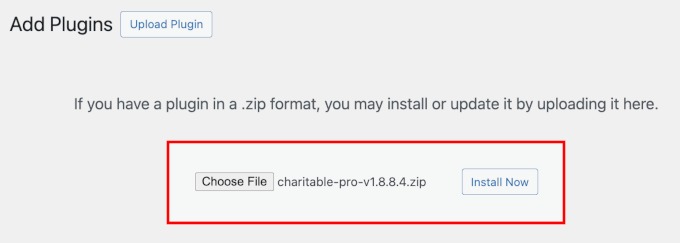
Then click the ‘Activate’ button when it appears. If you need help, then you can see our guide on how to install a WordPress plugin.
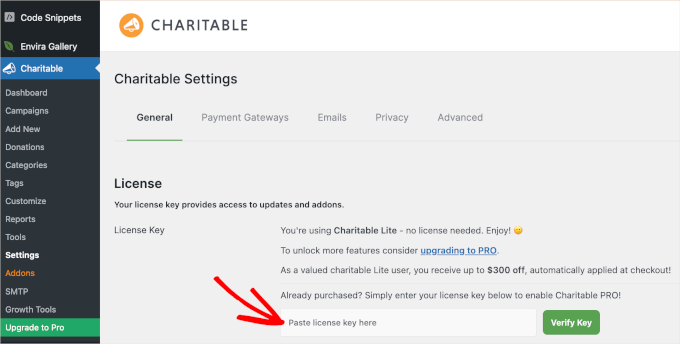
Now, you can enter your license key to unlock all the premium features that come with your chosen plan.
You can go to Charitable » Settings » License, paste it into the ‘License Key’ field, and click the ‘Verify Key’ button.
With that done, you’re ready to move on and start building your donor dashboard.
Step 2: Enable the Donor Dashboard in Charitable
Now that Charitable is set up on your WordPress website, it’s time to enable the built-in Donor Dashboard feature. This handy dashboard gives every donor a secure, private spot where they can check their donation history, update personal information, and manage any recurring gifts.
In your WordPress dashboard, navigate to Charitable » Settings » Donors and look for the option that says ‘Enable Donor Dashboard.’
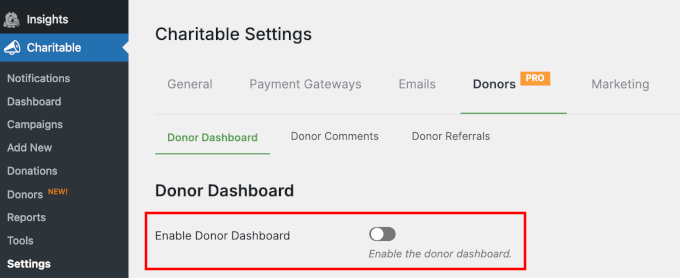
Just toggle that switch, and your donors will now have access to their very own dashboard as soon as they sign up.
Step 3: Customize Your Charitable Donor Dashboard
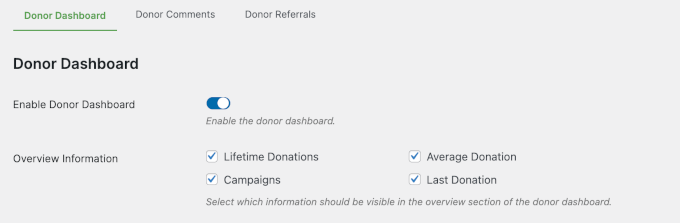
Once you’ve enabled the Donor Dashboard, you’ll unlock a bunch of configuration options to show or hide fields from your donor portal.
In the ‘Overview’ section, you can decide if you want to display:
- Lifetime Donations: Shows the total amount a donor has given across all your campaigns. It’s a great way to highlight their overall impact.
- Average Donation: Tells the donor how much they give, on average.
- Campaigns: Lets them see how many different campaigns they’ve supported.
- Last Donation: Displays when they last donated and how much.
Let’s say you want donors to see all their giving stats at a glance. You can simply check all these boxes so everything shows up in their dashboard.
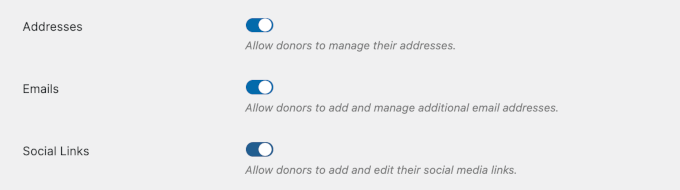
After that, you can decide whether donors can update contact and social details, like:
- Postal or shipping address – Useful if you send thank-you letters or physical gifts.
- Email address – Ensures that donors continue receiving updates and donation receipts.
- Social links – Lets donors connect their social media profiles and share their support more easily.
You can enable any combination, but I recommend turning on all three to give donors more flexibility.
Next, you can choose exactly which tabs and information appear for your supporters.
Here are the main options:
- Profile fields: Lets donors keep their information up-to-date, like their name, email, phone, birthday, avatar, and more.
- Dashboard tab options: The ‘Campaigns’ tab shows campaigns that donors have created or supported. Whereas ‘Comments’ allows them to view comments they’ve left on your campaigns.
- Password reset tool: Lets donors change their password for extra security.
Here’s what it might look like with everything enabled:
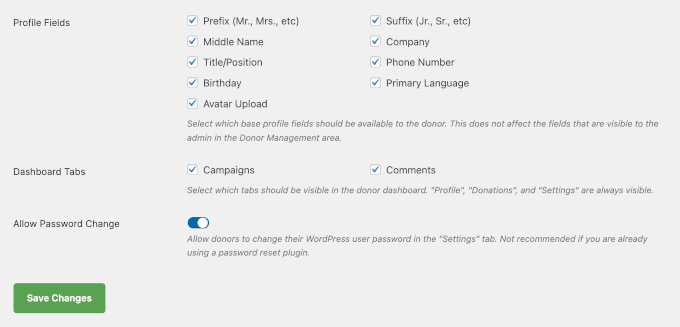
Once you’re happy with your customizations, don’t forget to hit ‘Save Changes’ to lock in your donor dashboard settings.
Step 4: Create a Donor Portal Page (Optional)
At this point, your donor dashboard page should be ready. This is because Charitable sets it up for you automatically.
But if you’d like to have a bit more control over how things look, it’s easy to set up your own custom page.
This optional step is great if you want to add a personalized welcome message, an image slider from your recent campaigns, or a special thank you video.
To do this, you can go to Pages » Add New from your WordPress admin area.
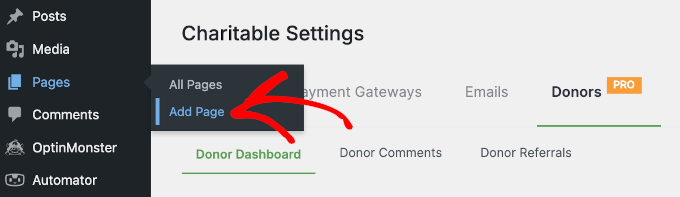
On the next screen, you can write the page title. Something like “Donor Dashboard,” “Giving Portal,” or “My Giving” works well.
Then, you can click the ‘+’ button to add the shortcode block. Simply use the search feature to quickly find it.
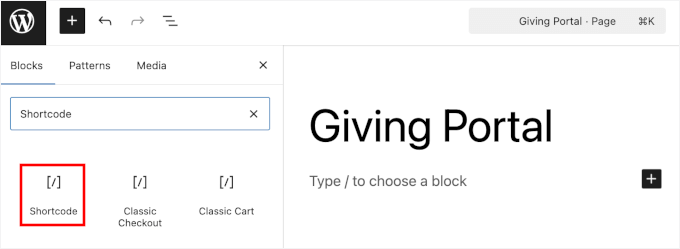
After that, simply add this shortcode to the page: [charitable_donor_dashboard].
🧑💻 Pro Tip: Don’t worry if the shortcode doesn’t show up in the content editor – it will still work. Just use the ‘Preview’ feature to see how the page will look to your website visitors.
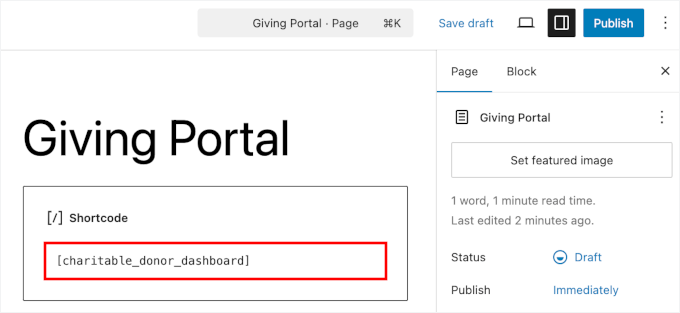
Once you’ve pasted in the shortcode, you can customize the page as you like.
For example, you could add a brief description to provide context. You might also want to add images, galleries, or carousels to showcase your nonprofit’s campaigns.
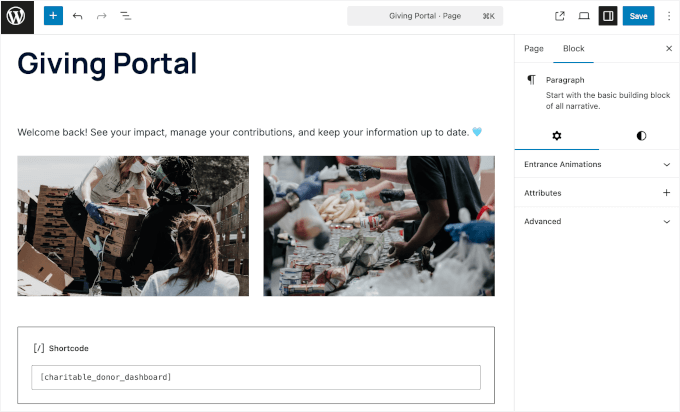
When you’re happy with how it looks, hit ‘Save’ or ‘Publish’ to make your new page live.
After publishing, there’s just one more quick step.
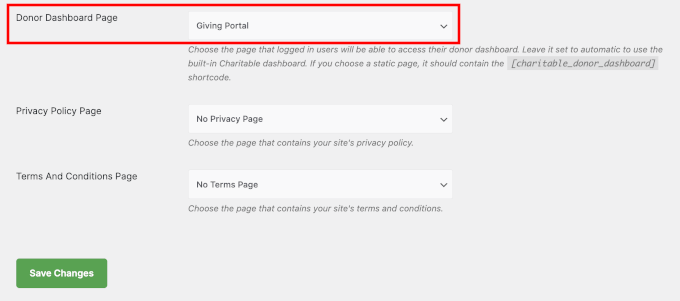
Let’s head back to Charitable » Settings » General » Pages to set your custom page to replace Charitable’s automatically generated donor page.
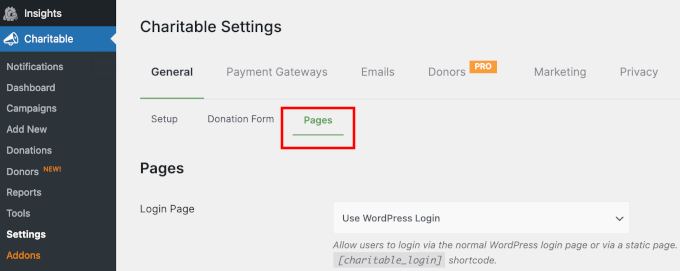
Here, you’ll want to scroll down the panel to the ‘Donor Dashboard Page’ section.
Simply use the dropdown menu to select the custom page you just created.
That’s it!
Now you have a dedicated donor portal on your nonprofit WordPress site. Your supporters can visit it any time to manage their giving.
Step 5: Preview the Dashboard as a Donor
Before you share your new donor dashboard with supporters, it’s always smart to test the portal yourself.
By logging in as a test donor, you can see exactly what your supporters will experience and make sure everything works smoothly.
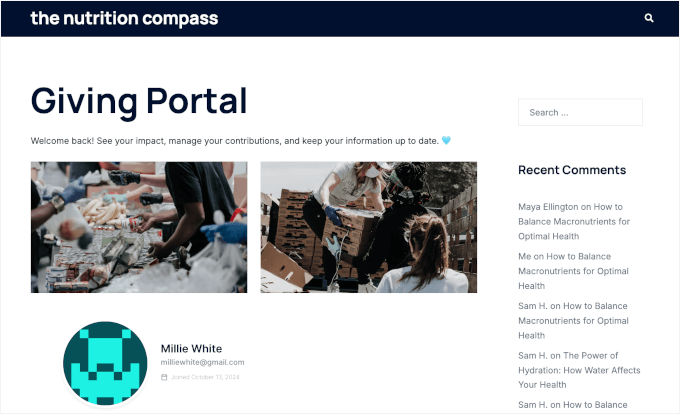
Here’s what to check in your donor portal:
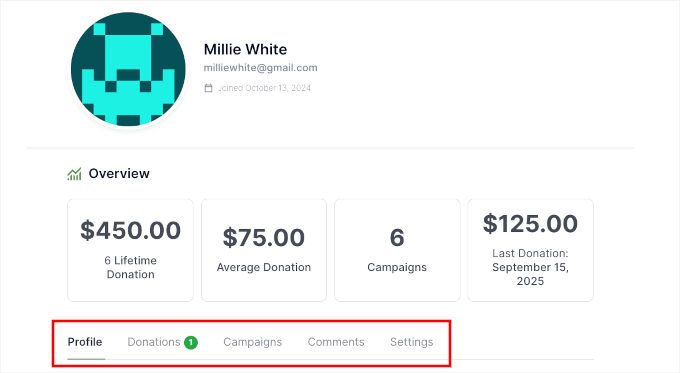
- Overview: Confirm that total donations, average donation, supported campaigns, and last donation all display correctly.
- Profile: Try updating contact details as a user would to make sure it’s quick and easy.
- Donations: Make sure your donation history appears correctly and includes all details – amount, date, campaign, status, and action (like downloading the receipt).
- Dashboard tabs: If you enabled ‘Campaigns’ and ‘Comments’ in Step 3, then you might want to check that the supported campaigns and any comments users left appear as expected.
- Settings: Check that managing email consent and changing the password are straightforward.
You can just move through each menu using the navigation tabs under the ‘Overview’ section.
✋ Disclaimer: The display might be different depending on your active WordPress theme. I used the Sydney theme on my test site, and the navigation uses the tab format, which I found very intuitive. But some themes use a dropdown instead.
For more picks, see our roundup of the best WordPress themes for nonprofits.
This process gives you a chance to spot anything confusing and make improvements. That way, everyone’s experience is as smooth as possible from the very beginning.
Bonus Donation Form Best Practices to Boost Donations
Once your donor dashboard is set up, you’re already a step ahead in building trust with your supporters.
But if you’re hoping to boost your donations even more, it’s worth taking a closer look at your donation form itself. Here are some proven donation form best practices to help you grow your nonprofit:
- Make Your Donation Form Easy to Find: Place your donation button or link front and center. The key thing is not to make visitors hunt for it.
- Explain the Impact: Tell supporters exactly how their gift will make a difference. A quick sentence or two about how donations help your cause goes a long way.
- Offer Secure, Flexible Payment Methods: Be sure donors can give safely and use the payment options they trust most.
- Set Preset Donation Amounts: Suggest a few different giving tiers or amounts to make choosing easier.
- Make It Shareable: Let donors quickly share your donation form or campaign on social media to help spread the word.
If you’d like a full walkthrough (with examples) on optimizing your donation form, check out our full guide on the top donation form best practices to boost donations in WordPress.
FAQs About Creating a Donor Portal in WordPress
Setting up a donor portal might seem overwhelming at first, but once you know the basics, it’s pretty straightforward.
Here are answers to some common questions:
How do I create a donation page in WordPress?
You can easily create a donation page by installing a WordPress donation plugin like Charitable. Once it’s set up, you can add a donation form to any page in just a few clicks.
Does Charitable include a donor portal?
Yes! Charitable comes with a built-in Donor Dashboard, making it easy to build your donor portal. When you enable this feature, donors get access to their own secure area where they can view their giving history, manage their information, and more.
Can donors manage their recurring donations?
Yes, they can! The Charitable Pro plans include a Recurring Donations addon. Once you enable it, supporters can easily manage, update, or cancel their recurring donations right from their personal dashboard.
Do donors automatically get an account?
It depends on the donation plugin you use. Charitable, for example, gives donors the option to create one either while making a donation or afterward. You can encourage them to sign up by including a link in your donation confirmation email or thank-you page.
Does Charitable allow donors to download receipts for taxes?
The Charitable plugin automatically generates PDF receipts for each donation. Donors can log in, view their donation history, and download receipts for their records or for tax purposes at any time.
Do I still need to email receipts manually?
Nope, if you use Charitable, as it handles this for you. Receipts are automatically sent to donors by email and are always available for download in their dashboard.
What if I want a member portal instead of a donor portal?
If you need a member portal with things like membership levels, exclusive content, or new member registrations, you might need a dedicated membership plugin instead. Some organizations decide to use both a donor portal for giving and a separate member portal for managing memberships.
Keep Exploring: How to Grow Your Nonprofit WordPress Website
I hope this guide has helped you build a donor portal for your nonprofit WordPress website.
If you found this helpful, then you might want to check out our other guides on:
If you liked this article, then please subscribe to our YouTube Channel for WordPress video tutorials. You can also find us on Twitter and Facebook.