You might have plenty of traffic coming to your WordPress site, but is it actually converting? I often talk to business owners who face the same challenge: visitors keep arriving, but sales and sign-ups aren’t growing.
I’ve run into that challenge myself and quickly learned that traffic is only half the battle. The real work is turning those visitors into customers, subscribers, or leads.
Over time, I tested many different strategies across my own websites. Small adjustments—like changing a button or headline—sometimes made a surprising difference. Other times, a full redesign was needed to see a real boost in conversions.
Through those tests, I discovered what works, what doesn’t, and how to keep building on each win.
In this guide, I’ll share the conversion rate optimization strategies that consistently deliver, along with practical steps you can start using today.
What Is Conversion Rate Optimization?
Conversion Rate Optimization (CRO) is the process of improving your website so that more visitors complete a desired action, or “conversion.” This might be making a purchase, signing up for your email newsletter, or filling out a form.
Your conversion rate is the percentage of visitors who take that action. To calculate it, just divide the number of conversions by the total number of visitors, then multiply by 100.
For example, if 50 people make a purchase out of 1,000 visitors, your conversion rate is 5%.
CRO is about making ongoing improvements based on real user behavior, feedback, and testing. To measure your progress, here are some common metrics to track:
| Metric (GA4) | What It Means | Why It Matters |
| Conversion Rate | The percentage of visitors who complete a goal, like making a purchase or signing up | It’s the main way to measure CRO success |
| Engagement Rate | The percentage of sessions where users actively engage (lasting 10+ seconds, triggering a conversion event, or viewing 2+ pages) | Shows if visitors are paying attention |
| Event Completions | The number of specific actions, like form submissions, video plays, or downloads | Helps track smaller “micro-conversions” that lead to bigger goals |
| Checkout Completion Rate | The percentage of visitors who finish checkout after starting it | Highlights problems like cart abandonment |
For more details, check out our ultimate guide to GA4 in WordPress for beginners.
Why Does CRO Matter for Website Owners?
CRO helps you get more value from your existing traffic. It can help turn more visitors into customers, subscribers, or leads, all without spending extra money on ads.
At WPBeginner, we’ve personally seen how small changes can have a huge impact.
For example, by adding OptinMonster’s exit-intent smart lightbox popup to our website, we increased our daily email signups from around 70–80 to 445–470. This was over a 600% growth with no increase in traffic.
Plus, even simple tweaks, like adjusting button placement or clarifying copy, can lead to improvements in conversions. And for online stores, optimizing the checkout process can reduce cart abandonment and increase sales.
🌟 Put simply: CRO helps you do more with what you already have, because every small improvement can lead to big gains in revenue.
Conversion Optimization Journey (At a Glance)
To make the guide easier to follow, here’s a quick roadmap of the conversion optimization journey:
| # | Stage | Focus | Examples From This Guide |
| 1 | Foundations | Understand your visitors and set clear goals | Audience research, defining success metrics |
| 2 | User Insights | See how people interact with your site | Heatmaps, UX reviews |
| 3 | Site Improvements | Make changes that encourage action | CTAs, landing pages, personalization, testing, content updates |
| 4 | Building Trust | Give visitors confidence to take the next step | Reviews, testimonials, urgency triggers |
| 5 | Ongoing Growth | Keep improving your site over time | Funnels, mobile optimization, retargeting, automation, monitoring |
In the following sections, I’ll share many different ways to do conversion rate optimization. Here’s a quick overview of all the topics I’ll cover:
Let’s get started!
Stage 1: Foundations
Strong conversion results start with the basics: knowing your audience and defining clear goals.
In this stage, you’ll learn how to understand your visitors and set goals so that you know exactly what success looks like.
Identifying and Understanding Your Target Audience
Before you optimize anything, you need to know who you’re optimizing for. When you understand your target audience, every headline, call-to-action, and landing page feels more relevant and more likely to convert.
A great way to start is by creating customer personas based on real data and research. A well-rounded persona usually includes:
- Challenges or pain points: What’s stopping them from making a decision?
- Demographic info: Age, gender, income level, location.
- Behavioral traits: Shopping habits, preferred devices, and content consumption.
- Goals: What they’re trying to achieve by visiting your WordPress site.
For example, if you sell pet supplies, one persona might be “Busy Pet Parent Bella” — a 34-year-old working mom with two dogs who values convenience and looks for fast delivery and loyalty rewards.
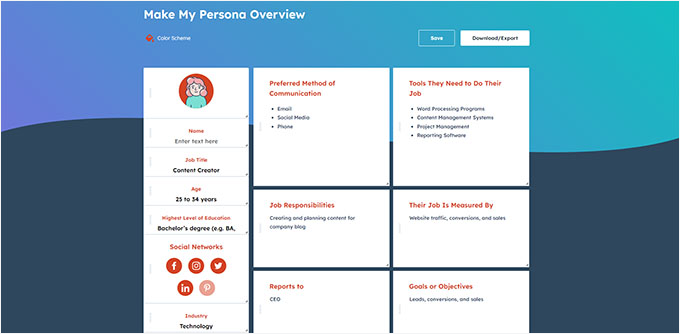
If you want a simple way to get started, HubSpot’s free Make My Persona tool can guide you through building a professional customer persona, step by step.
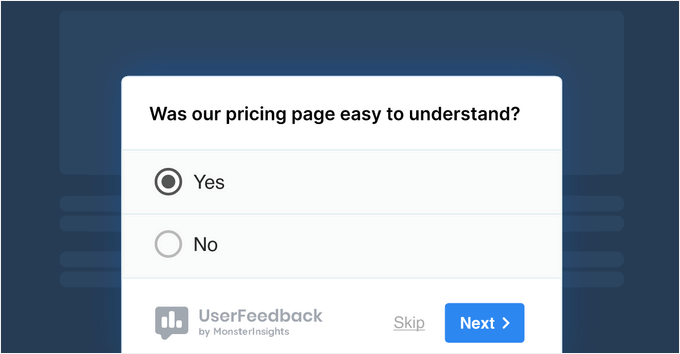
To dig deeper, tools like UserFeedback make it easy to collect insights directly from your visitors. You can learn about users directly from the source and easily identify their pain points and wants.
At WPBeginner, we’ve used it to run quick surveys for design clients, and it worked well without interrupting the user experience.
UserFeedback lets you ask questions like “Was our pricing page easy to understand?” or “What’s missing from this page?” to uncover valuable feedback. For more details, see our complete UserFeedback review.
Finally, don’t forget that analytics can also help you learn about your audience.
While Google Analytics is powerful, it can be overwhelming for beginners.
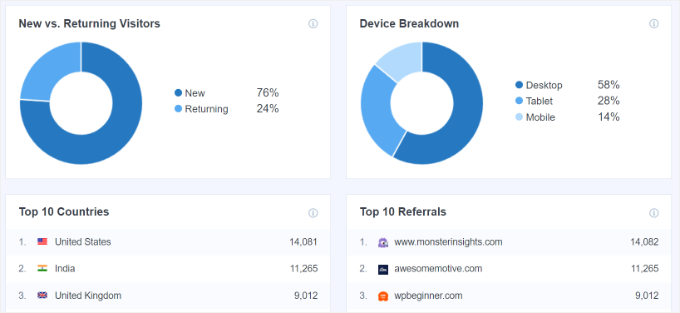
That’s why I use MonsterInsights, which brings the most important reports right into your WordPress dashboard. It shows who’s visiting your site, where they’re from, and which devices they’re using, all without digging through complicated GA4 menus.
Need help choosing your target audience? Check out our step-by-step guide on how to choose a target audience for your blog.
Setting Clear Goals and Metrics
Setting clear goals and tracking the right metrics is key to understanding whether your website is performing as expected and where you need to make improvements.
First, you need to think about what success looks like for your site.
If you’re running campaigns to capture leads, then key metrics might include form submissions, click-through rates (CTR), and new sign-ups. These metrics tell you how effectively your site is turning visitors into potential clients.
Success metrics can also vary depending on the type of website you’re running. For example:
- WordPress Blogs: Tracking page views, average engagement time, scroll depth, and social shares shows how much readers interact with your content and whether it’s worth sharing.
- Online Stores: Pricing page conversion rates, product views, average order value, and cart abandonment rate help you understand sales performance and customer behavior.
Overall, the most important metrics are those that directly impact sales. As Thomas Griffin, co-founder of OptinMonster, puts it:
Your pricing page is the single most important page that can make or break your business. If you’re not focused on improving conversions there, you’re leaving a lot of money on the table.
Thomas Griffin, Co-founder of OptinMonster
Next, you’ll want to turn those benchmarks into specific, measurable goals.
For instance, instead of aiming to “increase traffic,” you could set targets like “increase organic traffic by 20% in 3 months” or “grow email sign-ups by 15% over the next quarter.”
Once you have your goals in place, you can use a tool like MonsterInsights to see how they perform. For example, you can see the average order value (AOV) for your online store, which looks at how much each customer spends per transaction.
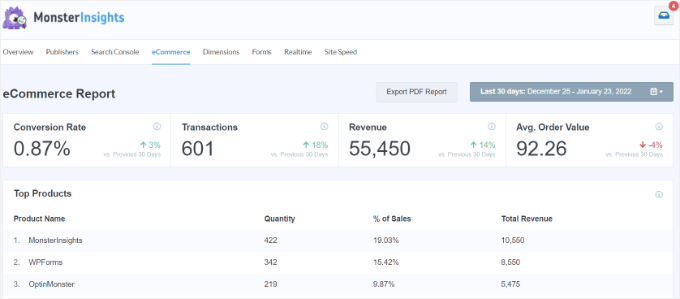
As Chris Klosowski, president of Easy Digital Downloads, explains:
Focusing on AOV is an effective way to grow a business, especially for eCommerce stores. By tracking this metric and testing strategies, you can give customers a reason to spend more, which directly improves your bottom line.
Chris Klosowski, President of Easy Digital Downloads
For details on how to better identify and set goals, you can see our guide on how to set up Google Analytics goals in WordPress.
Stage 2: User Insights
Once you’ve set clear goals, the next step is to see how visitors actually use your site.
By tracking clicks, scrolls, and engagement, you can uncover what’s working, what’s being ignored, and where small changes could lead to more conversions.
Creating Website Heatmaps
You can’t optimize what you can’t see. So, if you want to understand how visitors interact with your site, then heatmaps are a game-changer.
Heatmaps visually show you where users click, how far down they scroll, or what their mouse movements are like. This helps you spot what’s working and what’s being ignored on your website.
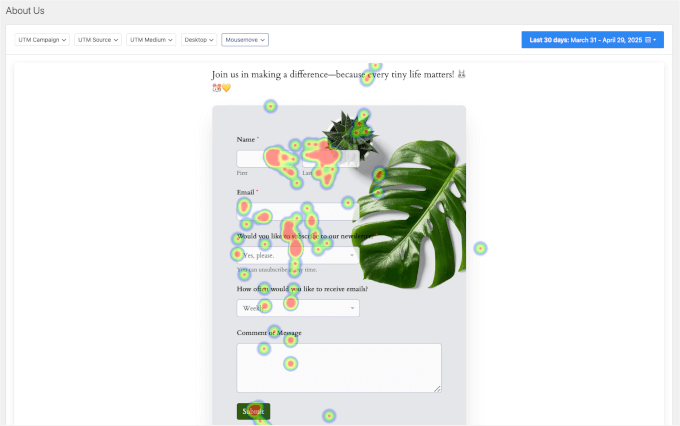
To create heatmaps for your WordPress site, I recommend using tools like Microsoft Clarity or UserFeedback. For details, you can see our guide on how to set up WordPress heatmaps.
These tools help you spot patterns, such as popular click zones or areas with high drop-off rates.
You can then make targeted design improvements, like:
- Move key elements, like buttons or registration forms, into high-visibility areas.
- Shorten or rearrange content if users stop scrolling before they reach your main offer.
- Test new layouts to highlight your CTA earlier on the page.
For more information on how to do this, I recommend reading our guide on how to create a high-converting landing page.
🎨 Insider Tip: Need help building or redesigning your site for higher conversions? Check out our WordPress website design services – we’ll do the heavy lifting for you. Starts at $599!
Doing a User Experience (UX) Audit
A user experience (UX) audit helps you understand how visitors interact with your website and where they run into problems. Even if your offer is strong, friction in navigation, layout, or speed can hold back conversions.
A positive user experience depends on many small but important details:
- Clarity: Clean layouts and readable design help build trust and make your website easier to understand.
- Accessibility: When your site works for people with disabilities, it’s also easier for everyone to use. See our ultimate guide to improving accessibility in WordPress.
- Navigation: Clear menus, dropdowns, and search bars make it simple for users to find what they need.
- Trust signals: Testimonials, reviews, security badges, and professional design reassure visitors they’re in the right place and can trust your brand.
- Speed: Fast-loading pages are critical because many users will leave if your site takes more than a few seconds to load. See our complete guide to improving WordPress speed.
Every small UX improvement adds up, and over time, these changes can lead to much better conversion rates. For more information, please see our guide on how to do a UX audit of your WordPress site.
Stage 3: Site Improvements
Now that you know your typical user behavior, it’s time to tweak your site to guide visitors toward action.
This stage focuses on improving the elements that drive results, like clear CTAs, optimized landing pages, personalized experiences, and A/B tests.
I’ll show you how to make targeted improvements that turn your insights into real, measurable results.
Crafting Compelling CTAs
A strong call-to-action (CTA) often makes the difference between a visitor leaving and one converting. Whether you want people to sign up, buy, or get in touch, your CTAs need to be clear, persuasive, and well-timed.
As John Turner, co-founder of SeedProd, explains:
If you want your visitors to act on your CTA, then you need to use actionable language that clearly tells them what they need to do next.
John Turner, Co-founder of SeedProd
Effective CTAs speak directly to the user’s needs or desires and offer something valuable in return for their action.
For instance,
- Words like “Get,” “Start,” or “Claim” signal benefit and ownership.
- Phrases like “Limited Offer” or “Last Chance” tap into urgency, prompting quicker decisions.

But it’s not just about what your CTA says. It’s also how it looks and where it appears.
Using a contrasting color is an easy way to make it stand out from the rest of the page. Your text should also be short, direct, and action-oriented, like “Download the Guide” or “Try It Free”.
For placement, CTAs often work best above the fold or at the end of persuasive sections. It’s also a good idea to put them near high-engagement areas like pricing tables or testimonials.
If you want to dive deeper into what makes a CTA truly convert, check out our CTA best practices for landing page conversions.
Optimizing Landing Pages
Landing pages are one of the most important parts of your website for getting more conversions. Whether you’re promoting a product, collecting leads, or offering a special deal, your landing page should be designed with a clear goal in mind.
To start, focus on the design elements that drive conversions. A strong headline grabs attention and communicates the value of your offer.
Here’s an example from Duplicator:
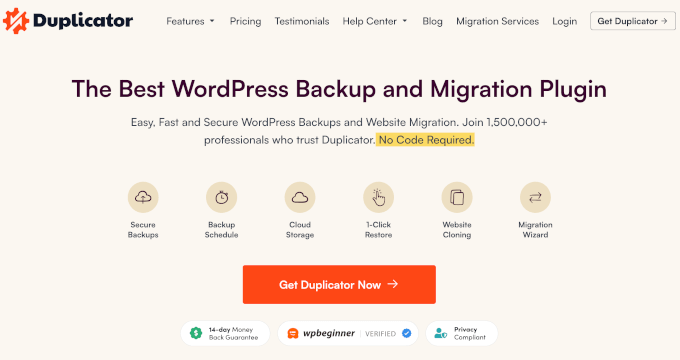

The rest of your page should build on that message with concise, persuasive copy that speaks to your audience’s needs.
For inspiration, here’s an example of a good landing page:
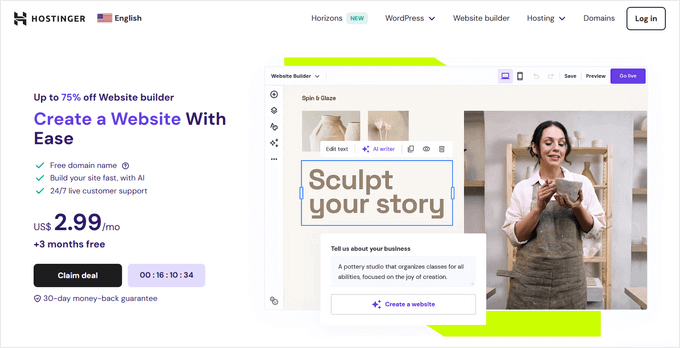

Why it’s good: Hostinger’s landing page, with a dedicated FAQ section, helpful chatbot, and customer testimonials, shows that businesses selling technical services should focus on building trust alongside their sales pitch.
For details on how to improve your own landing pages, see our guide to advanced landing page tips.
Using Personalization Techniques
Personalization helps you deliver the right message to the right person at the right time.
Instead of offering a one-size-fits-all experience, you can tailor your website’s content, offers, and CTAs based on who’s visiting and what they’ve done on your site.
This can significantly boost conversions by making your site feel more relevant and user-focused.
Here are some simple but effective ways to personalize your WordPress site:
- Show a welcome offer to first-time visitors.
- Remind returning visitors about products they viewed earlier.
- Display different CTAs based on whether a user came from social media, Google search, or your email newsletter.
- Promote time-sensitive campaigns to users browsing during holidays or weekends.
Even simple adjustments can noticeably increase repeat purchases and engagement.
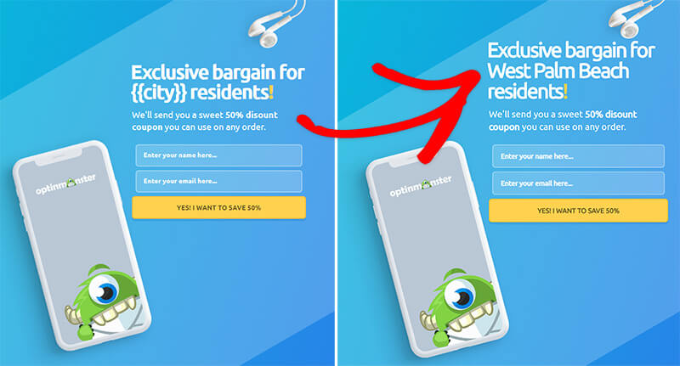
Even better, you don’t need custom code or complex logic to get started. You can use a powerful lead generation tool like OptinMonster.
It allows you to show popups, banners, or slide-ins based on where users are in the funnel – whether they’re just browsing, comparing options, or ready to buy. Plus, it has powerful exit-intent technology that shows popups to users right when they’re trying to leave your website.
Now, what I want to highlight from OptinMonster is their display rules.
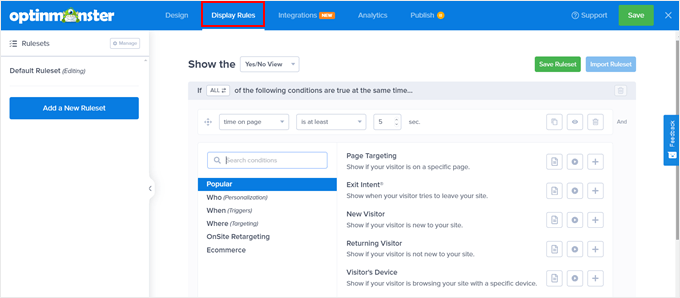
Here’s how OptinMonster’s Display Rules make personalization easy:
- Time-Based Triggers: Show campaigns based on specific dates, times, or days of the week, like flash sales for holidays.
- Targeting Users Matching Specific Criteria: Display content based on user source, geographic location, cookies, or even ad blockers.
- OnSite Targeting: Target new users, returning visitors, or users who have visited specific pages or performed specific actions on your site.
- eCommerce Display Rules: Tailor campaigns based on shopping behaviors, like cart contents or the total value of a cart.
Combining display rules can create highly targeted, non-intrusive experiences. This makes your content feel helpful, not spammy, which is key to building trust and improving conversions.
You can learn more in our guide on how to show personalized content in WordPress.
Using A/B Testing
If you’re making changes to your site based on guesswork, then you might be missing out on conversions. That’s where A/B testing (also called split testing) helps.
A/B testing allows you to test 2 versions of a page element, like a headline, button color, or CTA, and see which one performs better based on real user behavior.
Once you know what works, you can apply those insights across your site to steadily improve your conversion rate.
A/B testing tools like Thrive Optimize or Nelio AB Testing make it easy to experiment directly inside WordPress.
For example, with Thrive Optimize, you can create multiple versions of a landing page, set a specific goal, such as signups or sales. Then, the plugin will automatically split traffic and highlight the top performer.
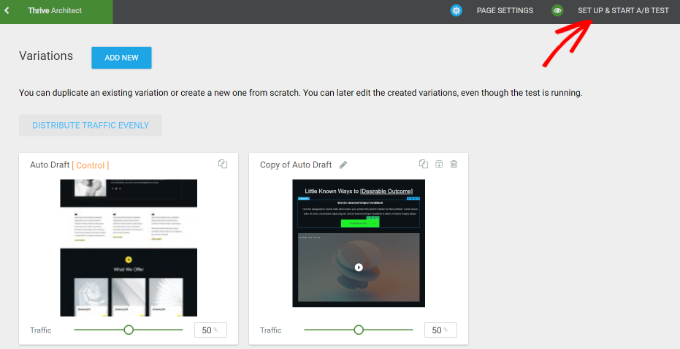
For details, please see our guide on how to run A/B split testing in WordPress.
Creating High-Converting Content
Great content isn’t just for attracting traffic. It’s also a powerful tool for turning visitors into subscribers, leads, or customers.
Whether you’re writing blog posts, product pages, or email campaigns, persuasive content can move people to take action.
Start by focusing on quality and clarity.
Your content should solve a problem, answer a question, or help the reader achieve a goal. And it’s a good idea to use a friendly, direct tone and structure your writing for easy scanning.
Plus, short paragraphs, clear headings, and actionable takeaways all help make your content easier to digest.
🧑💻 Pro Tip: You can also use AI tools like ChatGPT to brainstorm ideas, generate blog outlines, or speed up your first drafts.
Just be sure to review and edit for accuracy and voice. AI can help you work faster, but your content still needs that human touch to connect with your audience.
I also recommend adding images or videos that support your message. Infographics can also boost engagement and make your content easier to understand.
For example, step-by-step tutorials often benefit from annotated screenshots, while product pages might convert better with explainer videos.

For more guidance, please see how to write a great blog post.
Stage 4: Building Trust
Even the best-designed page won’t convert if visitors don’t feel confident taking action. That’s why the next step is building trust and credibility on your WordPress site.
Simple strategies like adding social proof, testimonials, and a touch of urgency (FOMO) can ease hesitation and make people more comfortable saying “yes.”
Displaying Social Proof
When visitors see that others trust your brand, they’re more likely to convert. This is the power of social proof – a psychological trigger that builds trust and reduces hesitation.
There are many forms of social proof that can influence conversions. They include customer reviews, testimonials, case studies, media mentions, trust badges, and social share counts.
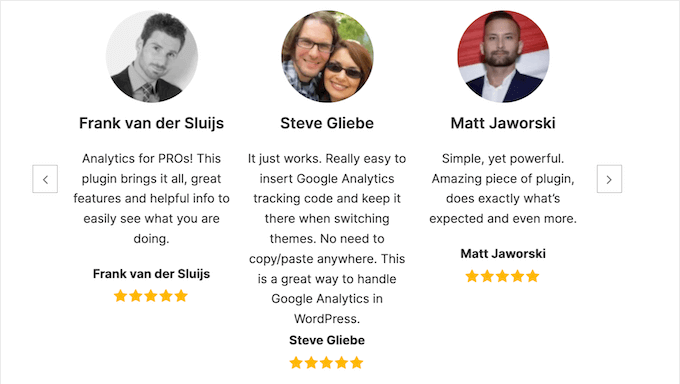
It’s also a good idea to place social proof strategically across your website, for example:
- Add testimonials or reviews near your call-to-action.
- Show a customer quote or star rating on landing pages.
- Use case studies on product or pricing pages.
You can also showcase positive customer reviews from social media platforms to boost your social proof.
Tools like Smash Balloon make it easy to embed Instagram posts, Facebook reviews, and more, directly on your website.
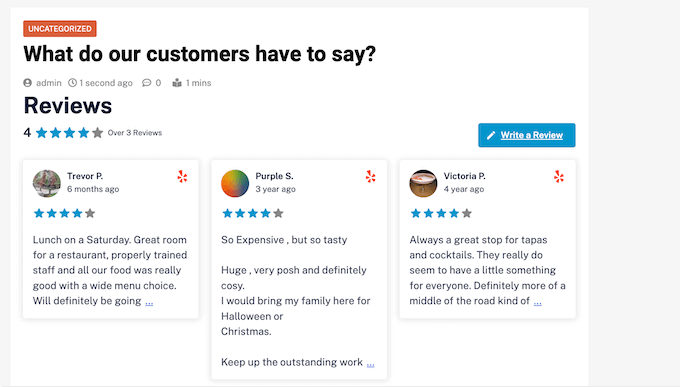
For more details, see our guide to the best social proof plugins for WordPress and WooCommerce.
Using Fear of Missing Out (FOMO)
FOMO, or the fear of missing out, is a powerful motivator. When visitors feel they might lose out on a good deal or a popular product, they’re more likely to take action quickly.
You can create a sense of urgency by offering limited-time promotions or flash sales. Countdown timers are especially effective, making the sales deadline feel real and immediate.
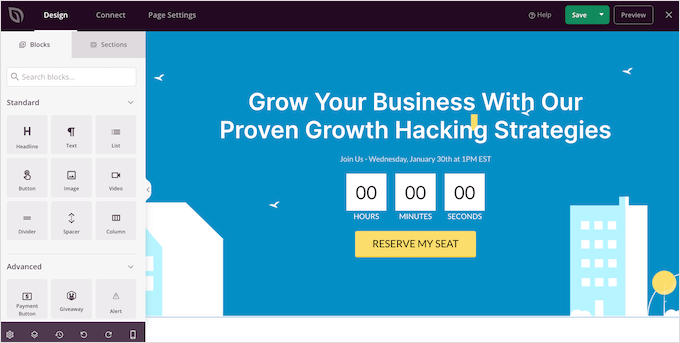
Another strategy is to display real-time activity on your site. Showing notifications like “Maria just bought this 5 minutes ago” or “10 people are viewing this product” signals that others are taking action, so maybe they should, too.
Plus, it’s very easy to set up real-time sales notifications in WordPress.
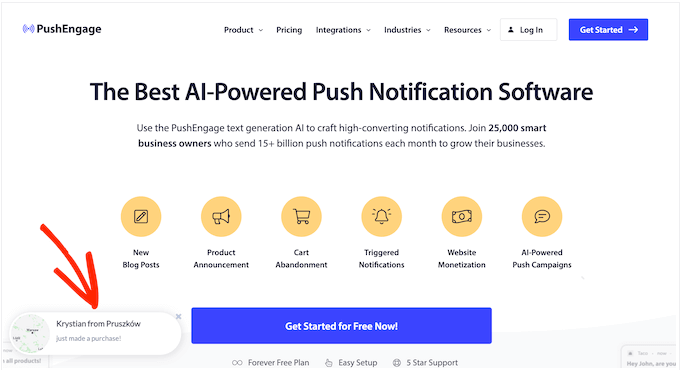
If you’re selling physical or digital products, consider displaying low stock levels or availability notices like “Only 3 left!” or “Spots filling fast.”
This can push hesitant users to decide before it’s too late.
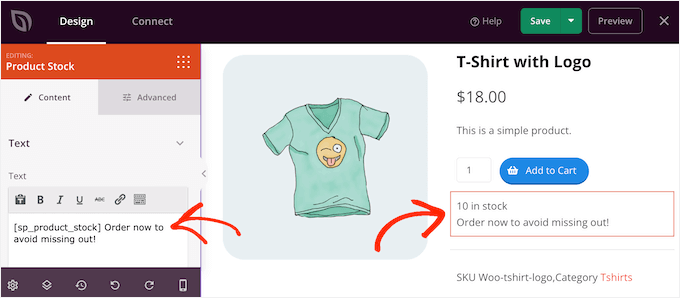
There are plenty of tools to help you add popups and real-time notifications to your WordPress site.
These are the tools I recommend:
- OptinMonster – Create time-limited promotions with countdowns. One success story is Cracku, which used a lightbox and fullscreen welcome mat with countdown timers to promote course discounts, boosting conversions by up to 300%.
- TrustPulse – Shows real-time notifications of purchases, signups, or downloads to build urgency and trust. For more information about this tool, you can see our in-depth TrustPulse review.
- SeedProd – Display stock availability, highlight limited-time offers, and use persuasive call-to-actions to drive conversions. It’s ideal for creating high-converting landing pages with clear, action-focused messaging.
For more tips, check out our guide on how to use FOMO on your WordPress site to increase conversions.
Stage 5: Ongoing Growth
For conversion optimization, the best results come from checking in regularly and making small improvements as you go.
In this stage, the focus is on keeping your site growing by refining funnels, watching how visitors behave, and using tools that help your site work smarter over time.
Planning Your Conversion Funnels
A conversion funnel is the journey visitors take from discovering your site to completing a desired action, like making a purchase or signing up. Optimizing each stage of this funnel is important for increasing conversions and driving growth.
The conversion funnel can be broken down into three main stages:
- Top of the Funnel (TOFU): This is where new visitors discover your brand, often via search engines or social media. Lead magnets, like ebooks or email courses, are great tools to grab attention and encourage engagement.
- Middle of the Funnel (MOFU): Visitors here are aware of your product or service and may be considering their options. The goal is to nurture their interest with more in-depth content like product demos, case studies, or free trials.
- Bottom of the Funnel (BOFU): At this stage, visitors are ready to act. Use strong CTAs like “Book Your Free Consultation” and create urgency with FOMO-driven offers or time-limited deals. I’ll talk about these topics in more detail in the next few sections.
So, how do you put a funnel like this into practice?
One option is FunnelKit. This powerful WooCommerce plugin lets you build high-converting sales funnels without writing a single line of code.
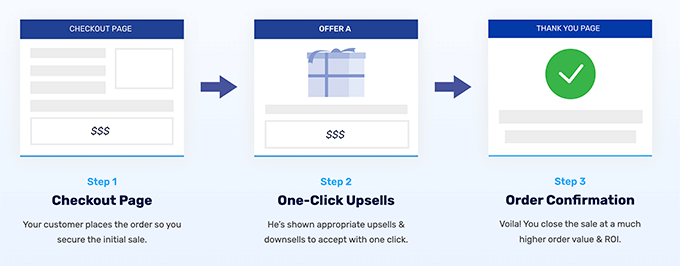
You can create full funnels from scratch or add extra steps to your existing checkout process, like order bumps or one-click upsells. It also tracks how your funnel is performing, so you can find what’s not working and make changes to boost conversions.
For step-by-step instructions, see our guide on how to make a high-converting sales funnel in WordPress.
Optimizing for Mobile Users
With over half of all web traffic coming from mobile devices, a poor mobile experience can quickly cost you conversions. If visitors have to pinch, zoom, or wait for slow-loading pages, they’re more likely to leave and never return.
It’s also not just about shrinking your site to fit a smaller screen. True mobile optimization involves touch-friendly navigation (like larger buttons and easier menus), readable fonts, enough spacing, and a streamlined checkout process.
Additionally, you should watch out for these common mobile pitfalls:
- Slow mobile load times. Be sure to compress images, minimize scripts, and use caching plugins to make your pages load quickly on mobile devices.
- Overloaded layouts. What looks great on a desktop may feel cramped on a phone. Simplify where possible – especially on landing pages.
- Unoptimized popups. Intrusive popups can frustrate mobile users. Use mobile-specific rules to display more subtle offers (like banners or slide-ins) on smaller screens.
To make your site mobile-friendly, you should start by choosing a responsive theme.
The best themes will allow you to fine-tune how each section of your page appears on phones and tablets.
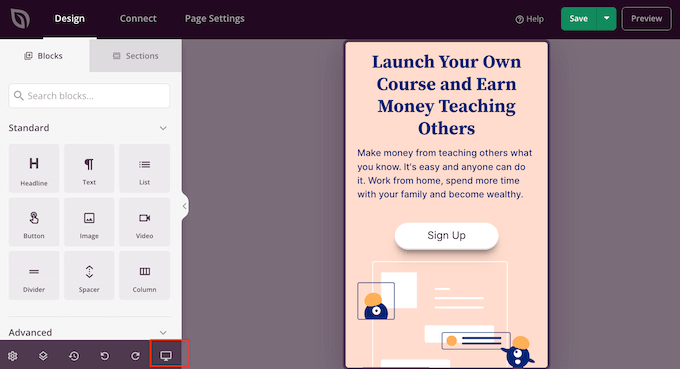
For a complete walkthrough, see our guide on creating a mobile-friendly WordPress site.
Using Retargeting Strategies
Most website visitors won’t convert on their first visit. But that doesn’t mean the opportunity is lost. With retargeting, you can stay top-of-mind and guide them back to your site when they’re ready to act.
Here’s how retargeting works: when someone visits your site, a tiny piece of code from an ad platform (often called a ‘pixel’) is triggered. This pixel then uses a cookie to place a unique, anonymous identifier in their browser.
You can then segment these audiences based on behavior, such as:
Segment 1: Users visiting a specific product or service page
Segment 2: Users adding an item to the cart but not checking out
Segment 3: Users spending a certain amount of time on your site
Behavior-based targeting makes your ads highly relevant and more effective because these users already know your brand.
To get the best results, you’ll want to:
- Tailor your ads based on what users did on your site. Don’t show the same ad to every user. Use dynamic ads or multiple creatives based on actions they took (or didn’t take).
- Limit ad frequency: Use frequency capping on your ads to avoid ‘banner fatigue,’ where users start ignoring your ads because they’ve seen them too often. Overexposure can actually hurt your brand perception.
- Set a smart retargeting window. For example, you might retarget abandoned carts within 3 days and bounce visitors within 7–14 days.
For step-by-step instructions, see our guide on how to use cookie retargeting in WordPress.
Using Automation Tools
Automation can help you convert more visitors without adding extra work to your plate. From capturing leads to sending targeted follow-ups, the right tools can move users through your funnel more efficiently.
For example, you could automatically send a welcome email series when someone signs up for your newsletter. Or you can trigger a cart abandonment email when a user leaves without purchasing.
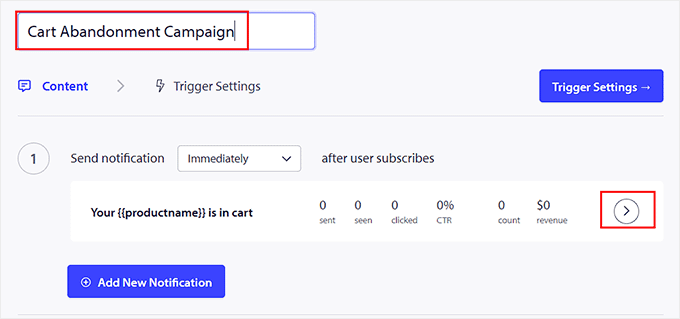
This kind of automation keeps your site working for you around the clock.
You can also automate popups or forms to appear based on user behavior, like time spent on a page or scroll depth. Marketing automation tools like OptinMonster, Constant Contact, and Brevo make it easy to set up rules and workflows that boost engagement and conversions.
For more information, we have a beginner’s guide to WordPress email marketing automation.
Regular Monitoring and Analysis
Conversion optimization works best when you keep checking in. Regular monitoring helps you spot what’s working, what’s slowing down, and where users are getting stuck, so you can adjust before small issues turn into big problems.
These tools can help:
- MonsterInsights: Brings your Google Analytics reports into your WordPress dashboard. It makes it easier to monitor traffic, user behavior, and key metrics like conversion rates. For details, see our guide on how to install Google Analytics in WordPress.
- Microsoft Clarity: Provides heatmaps and session recordings to understand how users interact with your site.
- GTmetrix: Allows you to check page speed and performance and offers actionable tips for improvement.
I also recommend setting a recurring schedule to analyze your site’s performance and make data-driven adjustments.
A good starting point is quarterly, but depending on your website’s traffic and business goals, you might want to review monthly or even weekly. During each review, you’ll want to assess key metrics, test new features or strategies, and adjust based on results.
Key Takeaways: WordPress Conversion Optimization in 5 Stages
To sum it up, by working through these five stages, you have a clear path to improving your WordPress website and boosting conversions.
Here’s a quick recap of everything I covered in this guide:
- Start with a strong foundation: Understand your visitors and set clear goals to guide your conversion strategy.
- Gather user insights: Use heatmaps, analytics, and UX reviews to see how people interact with your site and spot friction points.
- Improve site elements: Optimize CTAs, landing pages, personalization, and content to make it easy for users to take action.
- Build trust: Add social proof, reviews, testimonials, and urgency triggers to make visitors confident in converting.
- Focus on ongoing growth: Refine conversion funnels, optimize for mobile, use retargeting and automation, and monitor performance regularly.
FAQs: Conversion Rate Optimization in WordPress
Not sure where to start with improving your WordPress site conversions? Here are some of the most common questions we get from readers:
How do you optimize conversion rates in WordPress?
You can use tools like OptinMonster for creating high-converting popups, FunnelKit for building sales funnels, and Thrive Optimize for A/B testing landing pages. It’s also important to track user behavior with tools like MonsterInsights. This lets you know where visitors drop off and how to improve the user journey.
How do you measure CRO?
You measure CRO by tracking how many visitors complete a desired action, such as signing up, making a purchase, or filling out a form, and then comparing it to your total traffic. Analytics tools like MonsterInsights can show you these numbers and calculate your conversion rate automatically.
What is the formula for conversion rate optimization?
Conversion Rate = (Number of Conversions ÷ Total Visitors) × 100
So, if 50 people sign up for your newsletter out of 1,000 visitors, your conversion rate is 5%.
What is a good CRO tool?
Popular CRO tools for WordPress include OptinMonster for lead generation, MonsterInsights for tracking behavior, Thrive Optimize for A/B testing, FunnelKit for sales funnels, and UserFeedback for collecting visitor insights.
How much does a good CRO tool cost?
Prices vary based on features. Basic plans often start around $9–$29 per month, while advanced tools can cost $49–$199 per month. Many tools, like OptinMonster, offer money-back guarantees or free trials so that you can test them before committing.
Additional WordPress Conversion Guides
I hope this ultimate guide on conversion rate optimization helps you turn more of your website visitors into subscribers, leads, and paying customers.
Next, you might want to check out our guides on:
If you liked this article, then please subscribe to our YouTube Channel for WordPress video tutorials. You can also find us on Twitter and Facebook.


